
The Complete Trade Execution Checklist Before Entering Any Position
Quick Answer
A trading checklist is a fixed sequence of checks you run before entering any position. The checklist often includes identifying your prop firm account’s state, the market context, and stop placement. For prop firm traders, that means two layers: trade logic (is this a valid setup?) and account compliance (does this trade fit inside your daily loss limit, drawdown buffer, and consistency rule?). Skip either layer, and you’re gambling with capital you don’t own.
Key Takeaways
- Most prop firm challenges fail from rule violations and poor execution. A trading checklist closes that gap.
- A real trade execution checklist has two layers: trade logic (structure, entry, stop, size) and prop firm compliance (daily loss limit, drawdown buffer, consistency rule).
- The core checks apply across pairs and instruments, but each one still needs to be adjusted for what you’re actually trading, whether that’s a major forex pair, gold, or indices.
Prop firm data puts challenge failure as high as 76% to 85%, and most of those failures trace back to rule violations and overleveraging. That’s exactly what a solid trading checklist is built to prevent.
Most blown accounts weren’t lost on the chart; they were lost in the thirty seconds before the trade, the step traders skip when they’re excited, in a hurry, or “sure” about the setup.
A trading checklist closes that gap. Consider it as a gate you run through before every entry, on every instrument you trade, because the market you’re trading changes the details but it should never alter your trading discipline.
In this guide, we outline and discuss the full pre-trade checklist built specifically for prop firm challenge accounts, so you have a repeatable process to run before you click buy or sell.
Why entry mistakes often blow most prop firm accounts
Industry estimates put prop firm challenge failure between 76% and 85%, and the biggest drivers are overleveraging and emotional trading. That’s why only about 7% of traders who start a challenge ever reach a payout.
Read that again. Traders with working strategies are failing challenges at a rate that often has nothing to do with whether their setup was correct. They’re failing because of what happened around the trade. For instance:
- The position was slightly too oversized
- The entry was taken fifteen minutes before Non-Farm Payrolls
- The second trade of the day pushed them past their daily loss limit without them checking the math first.
This is the part most retail trading checklists miss entirely. In prop firm trading, the context is even more nuanced.
I’ve watched students nail the technical read — right structure, right liquidity sweep, right entry — and still get disqualified. Not because the trade was wrong. Because they didn’t check their daily loss remaining before they took a second trade after a loss. The chart was never the problem. The checklist was missing.
As of 2026, prop firm rules have only gotten more specific — consistency scores, trailing drawdowns, scaling plans — which means a pre-trade checklist built for a retail account is no longer enough. You need one built for the account you’re actually trading.
What are the common myths about trading checklists?
Before we break down the checklist, let’s acknowledge some of the most common beliefs about trading checklists that may be holding you back.
Myth: More indicators on the chart means a safer entry
Reality:
- A checklist isn’t about stacking confirmations until a setup feels bulletproof
- It’s about running the same five checks every time, regardless of how many indicators agree
- Extra indicators often just delay the moment a trader admits a setup doesn’t actually meet the criteria
Myth: Once you’re experienced, you don’t need the checklist anymore
Reality:
- Experienced traders blow challenges too — often faster, because confidence makes it easier to skip the account-state check on the assumption that “this one’s obviously fine”
- The checklist isn’t a beginner’s training wheel
- It’s the thing that keeps discretion from turning into impulse
Myth: The checklist slows down good opportunities
Reality:
- The full sequence of going through a trading checklist only takes minutes
- A trade that can’t survive a two-minute check wasn’t a time-sensitive opportunity
- It was an impulse with a deadline attached to make it feel urgent
Myth: A checklist is only useful for entries, not account management
Reality:
- Daily loss remaining, drawdown buffer, or consistency rules in prop firms have often nothing to do with reading a chart
- It has everything to do with staying in the challenge long enough for a good strategy to prove itself
The two-layer checklist system
Every trade you take on a funded or evaluation account has to clear two separate checks, and most traders only run one of them. If you haven’t built a full trading plan yet, these two layers are exactly what belongs inside it.
Layer 1 — Trade logic
Is this a valid setup? Does the structure support it? Is there a clear invalidation level? This is the layer every trading course teaches.
Layer 2 — Account compliance
Does taking this trade fit inside your daily loss limit? Does it leave enough drawdown buffer if it’s wrong? Does it risk a consistency violation if it wins big? This is the layer almost nobody checks, and it’s the one that ends more challenges than bad entries do.
A trade can pass Layer 1 completely with a perfect structure, clean entry, tight stop but still be the wrong trade to take, because Layer 2 says no.
The 5 Step Trade Execution Checklist
The five checks that follow map onto these two layers in order: account state and market context sit in Layer 1’s setup phase, entry validation and position sizing straddle both layers, and the final psychology gate closes the loop.
Run them in sequence, every time, before every entry, on every instrument and every day. Be sure to include the days when you’re close to your profit target or whenever you’re tempted to skip a step to get there faster. Here are the steps:
Check your account state before you even open a chart
Before you look at a single candle, you need to know exactly where your account stands. This is Layer 1’s first gate, and it takes under two minutes.
Run through this before opening your platform:
- Daily loss remaining — how much can you still lose today before hitting the daily loss limit, in dollars, not percentage
- Drawdown buffer — the distance between current equity and your maximum drawdown floor
- Open positions — what’s already exposed, and what it does to your available risk if it moves against you
- Consistency math — if your firm caps any single day at 30–50% of total profit, how much can today’s trade actually contribute before it creates a problem later
A technically sound setup taken without recalculating daily loss remaining can push a trader past their limit before the stop even gets hit, even when the trade itself was read correctly.
The fix is developing a habit. Write your daily loss remaining and drawdown buffer on a sticky note, a spreadsheet, or the printable checklist. Learn to update your checklist before every trade. This kind of pre-market check works best as part of a full daily trading routine.
Mentorship students who pass consistently all share one habit — they check their numbers before their charts. The chart tells you what might happen. Your account state tells you what you can afford to have happen.
Read the market context before you look for an entry
Once your account state is confirmed, the next check is the market itself. The specifics shift depending on what you’re trading, but the checks themselves don’t.
Three things to confirm before you start hunting for a setup:
- Economic calendar — Is a high-impact release inside your trading window? Does it affect the instrument you’re about to trade? (e.g. US data moves XAUUSD and USD pairs; other central bank events move their respective currencies)
- Session timing — Are you trading during the session where your instrument is most liquid? Or during a thin session where spreads run wider across the board?
- Spread check — What is the spread showing right now on your instrument, against what you’d normally expect?
This matters more on some instruments than others. Gold, for instance, normally trades at a spread of roughly $0.10–$0.50, but that can widen to 50+ pips during major news releases — a cost that gets added directly to the trade before price has even moved.
Major forex pairs behave differently: tighter baseline spreads, but still vulnerable to the same widening around high-impact data. The instrument changes the numbers. It doesn’t change the check.
A simple rule solves most of these issues. You shouldn’t execute new entries in the 15 minutes before or after a high-impact release affecting your instrument.
Following that principle prevents more damage than any change to entry strategy, because it removes the highest-volatility window from the risk of losing your prop firm account.
Also, trading session timing matters. The London–New York overlap — the most liquid window for gold and most major pairs alike — often presents the best trading conditions.
Plan around the sessions that work best for your instead of forcing entries during the thin Asian session, when spreads tend to run wider across most instruments for no fundamental reason.
Validate your trade entry
This is where Layer 1 and Layer 2 start to overlap, because a technically valid entry is also the one most likely to keep you inside your risk parameters.
Using key Smart Money Concepts, three questions decide whether an entry is valid:
- Does market structure support the trade? A break of structure or a shift in the order flow, not just “price looks like it might turn here.”
- Is there a clear liquidity reason for this level? A swept high or low, a fair value gap, an area where volume concentrates are areas where price is likely to react because of where orders actually sit
- Is there a single, clear invalidation level? If price hits X, the idea is wrong. If you can’t name that level in one sentence, the setup isn’t ready.
A setup that passes all three earns an entry. A setup that “feels right” because the market has been trending all day doesn’t. Trend context should support your trade.
The contrast matters here. A trader entering off pure momentum has no invalidation level, which means their stop placement becomes a guess. A trader entering off structure and liquidity has a level the market has to break before the idea is wrong, which is what makes the next check, position sizing, possible to calculate with any precision at all.
Calculate position size before you calculate anything else
Once an entry passes structure and liquidity, the next question isn’t “how much can I make” — it’s “how much am I risking, in dollars, and does that number fit inside what’s left of my daily loss limit.”
The formula:
Position size = (Account risk % × account balance) ÷ (stop-loss distance in pips or points × pip/point value)
The formula stays the same across every instrument. What changes is what you plug into it. Run your own numbers with our position size calculator before you enter.
How much to risk per trade
- Most funded traders risk 0.5%–1% of account balance per trade — not the 2% figure that gets thrown around in generic trading content
- On a $50,000 account, that’s $250–$500 at risk on a single position
- That range is small enough that three losing trades in a row still leaves room inside most daily loss limits
What changes by instrument
- Major forex pairs — pip value is fixed and predictable, so the formula’s second half is straightforward
- Gold (XAUUSD) — pip value shifts with lot size, and the position needs adjusting for spread cost on top of stop distance, since a wider spread effectively moves your real entry price
- Indices — point value and typical volatility both need checking against your broker’s contract specs before sizing
The risk percentage never changes. The math underneath it does, depending on what’s on your chart.
The risk-to-reward check
- Aim for at least 1:2 — potential profit at least double the amount risked
- Run this check after factoring in realistic spread and stop distance, not on the clean chart numbers alone
- If the math doesn’t clear that bar once those costs are included, the trade isn’t worth taking, no matter how clean the entry looks
New students almost always oversize. They see a clean setup and want to press it. But a 1% risk trade that hits its stop still leaves 99% of the account standing tomorrow. A 3% risk trade that hits its stop three times in a row doesn’t leave much of anything.
Set your stop-loss and take-profit before you enter
This check sounds obvious and gets skipped constantly. Both levels need to be set from structure and volatility — never from how much you want to make or how little you’re willing to admit you’re wrong.
What makes a stop technical vs. emotional
- Technical stop — placed beyond the swing point that would invalidate your trade idea
- Emotional stop — placed at a round number because it “feels safe,” or matched to a fixed dollar amount decided before you even looked at the chart
- Emotional stops get moved once price gets close, which defeats the entire point of having one
Setting the take-profit
- Target the next meaningful structural level, or a fixed risk-multiple from your entry
- Avoid picking a price because it would just “feel good” to hit
- Once both levels are set, don’t touch them unless the original trade idea is invalidated by price action — not by a temporary drawdown that makes you nervous
Can you explain your trade?
Before every entry, ask one question: why am I taking this trade, right now? A specific, nameable reason tied to the checks already run — structure, liquidity, invalidation level, and risk that fits inside the account’s daily loss remaining.
If the honest answer involves boredom, frustration, or trying to recover a loss from twenty minutes ago, that’s an emotional reaction. It’s not a sound trading plan.
This single question catches more bad entries than any technical filter, because it forces a trader to notice the difference between a plan and an impulse before money is on the line rather than after.
It’s also the check most likely to get skipped under pressure or when you’re tempted to take a marginal setup just to finish faster. This is exactly the moment the question matters most, because a consistency violation or an oversized “one more trade” can undo an entire week of clean execution in a single entry.
The traders who pass consistently aren’t the ones who never feel the urge to skip a step. They’re the ones who ask the one-sentence question anyway, every time, especially when they don’t want to hear the answer.
Retail checklist vs. prop firm challenge checklist
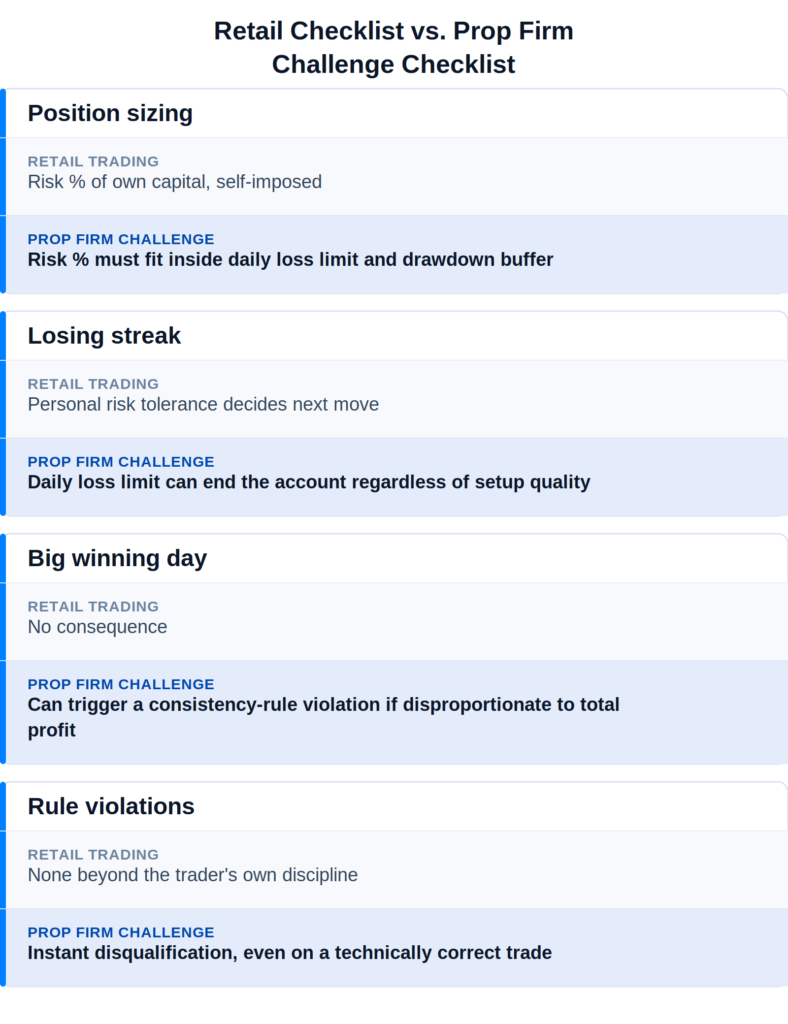
The technical checks — structure, liquidity, invalidation, stop placement — are close to identical between the two. What separates them is Layer 2: the account rules that turn a correct trade into a disqualifying one if the compliance check gets skipped. For the full breakdown, see our guide on how to pass a prop firm challenge.
Check every trade you make
A trading checklist doesn’t make every trade a winner. It makes sure the trades you take are ones you can actually afford to be wrong about, especially inside the account rules you’re actually trading under, on whatever instrument you’re trading that day.
The traders who pass prop firm challenges consistently are the ones who run the same five checks in their trading plans, especially on the days it would be easiest to skip one.
Revenge trading and skipped checklists come from the same root cause: no rule made before the pressure hits. Book a free Discovery Call with us and we’ll walk through it together.
Frequently asked questions
Do I need a different checklist for every instrument I trade?
No — the five checks stay the same across instruments, but a few numbers inside each check shift. Gold’s spread alone can swing from $0.10–$0.50 in normal conditions to 50+ pips during major news, while major forex pairs run tighter but still widen around high-impact data. So the market-context and position-sizing checks need instrument-specific numbers even though the process itself doesn’t change. Build one checklist template and adjust the spread and volatility figures for whatever you’re trading that session.
How long should running a full pre-trade checklist actually take?
Under five minutes once it’s a habit. Account state and market context take under two minutes combined, and entry validation happens alongside your usual chart analysis rather than as a separate step. The time it takes drops fast with repetition — the goal isn’t speed on day one, it’s consistency by week three.
What if a trade passes Layer 1 but fails Layer 2?
Skip it, even if the setup looks perfect. A technically valid trade that would push you past your daily loss remaining, break your drawdown buffer, or risk more than the 0.5–1% you’ve budgeted per position isn’t a trade worth taking on a challenge account. That discipline is exactly what separates traders who pass from traders who get disqualified on a trade that would have won.
Can I use a mental checklist instead of writing it down?
Not reliably, especially early on. A written or printed checklist removes the chance that stress or excitement causes a step to get skipped without you noticing. Most traders can run the full five-check sequence from memory eventually, but even experienced traders benefit from a physical or digital version during high-volatility sessions, when the temptation to shortcut the process is highest.
Does a checklist work for scalping, or only for swing and day trading?
It works for both, but scalping compresses the under-five-minute window available to run it, which makes the account-state and spread checks even more important, not less. If a strategy trades frequently enough that running the full checklist every time feels impossible, that’s a signal the strategy’s risk parameters — not the checklist — need adjusting.



Coach Aly
Coach Aly is the founder of The Prop Trading Academy and a funded forex trader. She is passionate about helping traders master the markets, pass prop firm challenges, and achieve long-term trading success.